
Here's the catch: "connecting an ELD" isn't one universal process. A plug-and-play OBD-II device pairs differently than a Bluetooth unit or a hardwired ECM system. Many fleet managers assume it's a one-size-fits-all setup, then get stuck when their device doesn't match their vehicle's port.
This guide walks through the exact connection steps, breaks down the three main connection types, lists what to prepare beforehand, and fixes the most common pairing headaches. By the end, you'll know exactly what to expect before you plug anything in.
Key Takeaways
- ELDs connect via three methods: OBD-II/9-pin plug-and-play, Bluetooth, or hardwired ECM
- Basic setup order: install hardware, download the app, log in, then pair and verify
- Most first-time issues trace back to wrong ports, disabled Bluetooth, or outdated apps
- Self-install devices, like Azuga's OBD-II ELD, connect in minutes without a technician
How to Connect Your ELD Device (Step-by-Step)
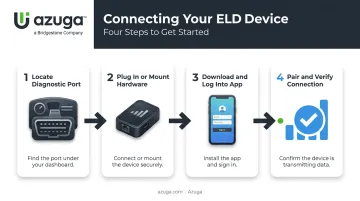
Regardless of which ELD you're using, the connection process follows the same general sequence. Get these four steps right, and you'll avoid 90% of setup problems.
Step 1: Locate Your Vehicle's Diagnostic Port
Every commercial vehicle has a diagnostic port that your ELD hardware plugs into. Finding the right one matters more than most drivers realize.
- Light and medium-duty vehicles typically use a 16-pin OBD-II port, usually tucked under the dashboard near the steering column
- Heavy-duty trucks often use a 9-pin connector following the SAE J1939 standard
- Connector type matters before buying an adapter: a mismatched pin count means the device simply won't seat
Safety first: Turn off the ignition before plugging in any hardware. Working around a live diagnostic port with the engine running risks both a bad connection and a shock.
Step 2: Plug In or Mount the ELD Hardware
Once you've confirmed the port, install the device.
For plug-and-play units, insert the connector firmly until it clicks into place. Don't force it at an angle; diagnostic ports are keyed to fit one way only.
Hardwired units follow a different path entirely. A technician runs wiring per the manufacturer's guide and integrates it directly with the vehicle's ECM.
Self-install devices skip the technician step altogether. Azuga's plug-and-play OBD-II ELD, for example, is built so a driver can install it themselves in minutes — no shop appointment, no vehicle downtime.
Step 3: Download and Log Into the ELD Driver App
With hardware installed, move to the software side.
- Download the manufacturer's app from the App Store or Google Play
- Enter your carrier and driver credentials (provided by your fleet manager or in a welcome email)
- Complete your driver profile, including vehicle assignment
This step is where a lot of drivers get impatient and skip ahead. Don't. An incomplete profile is a common reason engine data won't sync later.
Step 4: Pair the App With the Device and Verify the Connection
Now bring the app and hardware together.
- Enable Bluetooth or Wi-Fi on your phone or tablet
- Open the app's device list and select your vehicle from nearby devices
- Tap "Connect" and wait a few seconds
Confirm success by checking for a green status icon in the app. Then verify that engine data, like ignition status and odometer reading, is actually populating. If the screen stays blank, don't assume it's connected just because the icon looks right.
Types of ELD Connections & Compatibility
Types of ELD Connections & Compatibility
Not every ELD connects the same way, and the method you choose affects setup time, portability, and how many trucks you can outfit in a single afternoon.
Plug-and-Play OBD-II/9-Pin Devices
These plug straight into the diagnostic port with zero wiring involved. That makes them ideal for
- Fast self-installation (often under a few minutes per vehicle)
- Easy transfer between vehicles if you rotate trucks or lease equipment
- Fleets that want to scale up without scheduling installer visits
This is the category Azuga's OBD-II ELD falls into, and it's the reason fleets like Acree Air were able to get every vehicle back on the road within minutes of receiving devices.
Bluetooth/Wireless Connections
Here, the device pairs with a driver's smartphone or tablet over Bluetooth instead of a wired app connection. Keep in mind
- Range is limited — typically a few feet, so keep the phone close to the mounted device
- The app needs Bluetooth and location permissions enabled to detect nearby hardware
- Signal drops are the most common complaint with this connection type
Hardwired/ECM-Integrated Devices
These are wired permanently into the vehicle's ECM, usually by a professional installer. Larger fleets with complex telematics stacks — multiple sensors, camera integrations, custom reporting — often prefer this route because it's less prone to accidental disconnection.
Federal guidance supports multiple connection methods. The FMCSA confirms that both hard-wired and Bluetooth connections are acceptable, as long as they use standard communication protocols like serial or Controller Area Network (CAN bus).
Ultimately, the agency allows any reliable connection—including internet or Bluetooth—provided the driver's record of duty status remains current and accessible at all times.
What You Need Before Connecting Your ELD
A few minutes of prep work prevents most first-time connection failures. Before you start
- Confirm FMCSA registration: verify your ELD model appears on FMCSA's registered device list and matches your vehicle's make, model, and port type
- Check driver hardware: make sure the driver has a smartphone or tablet with the Azuga Fleet app installed, plus adequate mobile data or Wi-Fi access
- Gather credentials: have the carrier's USDOT number, driver login details, and vehicle/unit ID on hand before starting setup
Skipping any one of these usually means starting the whole process over once you realize something's missing halfway through.
Common Mistakes and Troubleshooting ELD Connection Issues
Connection issues are common during first-time setup, but they're almost always simple to fix once you know what to check.
Common Mistakes to Avoid
Plugging into an incompatible or damaged port without confirming pin type first, since a bent pin or wrong connector count won't seat properly
Skipping app updates, which frequently causes pairing failures when device firmware has moved ahead of the installed app version
Assigning the ELD to the wrong vehicle profile in the app, which causes logged engine data to not match the truck's VIN
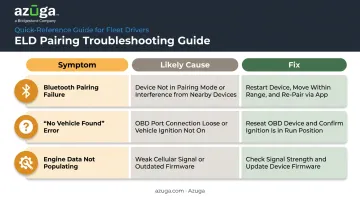
Even after avoiding these mistakes, issues can still crop up. Here's how to diagnose the most common ones
| Symptom | Likely Cause | Fix |
|---|---|---|
| Device won't pair via Bluetooth | Bluetooth is off, or the phone is out of range | Enable Bluetooth and move within a few feet of the device |
| App shows "No Vehicle Found" | Ignition is off, or the device isn't fully seated | Recheck the connection and restart the ignition |
| Engine data not populating after connection | Outdated firmware or a loose connector | Check for pending updates, then reseat the hardware firmly |
Loose connections carry a compliance risk too. FMCSA rules state that losing required engine-synchronization data for more than an aggregate 30 minutes in a 24-hour period triggers a compliance malfunction, so reporting obligations kick in for both driver and carrier if the issue isn't resolved quickly.
Conclusion
Connecting an ELD isn't complicated once you match the right device type to your vehicle and follow the steps in order: install, download, log in, pair, verify. Most connection failures come down to compatibility mismatches or a skipped update, not deep technical problems.
That mismatch risk is exactly why choosing a self-installable device removes so much friction, for fleets of any size. A plug-and-play OBD-II ELD, like Azuga's, means drivers handle setup themselves in minutes, without waiting on a technician or losing a vehicle to downtime.
Frequently Asked Questions
How do I connect my ELD?
Plug the device into your vehicle's diagnostic port, or have a hardwired unit mounted. Download the manufacturer's driver app, log in, and pair via Bluetooth or Wi-Fi. The app's status indicator confirms the connection.
Can I use my phone as an ELD device?
Not on its own. The phone displays data through the app, but a certified hardware device records the engine data that FMCSA requires. Both components together must be registered as the ELD.
How much does ELD cost?
Azuga's ELD packaging is matched to fleet size and the features you select, which includes 24/7 support.
How does ELD work?
An ELD connects to your vehicle's engine control module to automatically record driving time, location, and hours-of-service data. This replaces manual paper logs with continuous, accurate tracking.
What should I do if my ELD device won't connect or pair?
Confirm the ignition is on, restart Bluetooth on your phone, check for pending app updates, and reseat the device in its port. These four checks resolve most pairing issues.
Is professional installation required to connect an ELD?
Hardwired units typically need a technician. Plug-and-play OBD-II devices, like Azuga's, are built for driver self-installation in minutes, no professional help required.